How to install AWS System Manager (SSM) Agent on windows using PowerShell?
Welcome to itscloudhub!!
In the previous post, we were looked how to install AWS SSM Agent on Linux Distribution. In this blog post, we will discuss how to install AWS SSM Agent on Windows machine.
https://www.itscloudhub.com/2022/03/how-to-install-aws-system-manager-ssm.html
AWS Systems Manager Agent (SSM Agent) is preinstalled, by default, on the following Amazon Machine Images (AMIs):
1. Windows Server 2008-2012 R2 AMIs published in November 2016 or later
2. Windows Server 2016, 2019, and 2022
If your managed instance is a Windows Server 2008-2012 R2 instance created before November 2016, then EC2Config processes Systems Manager requests on your instance. We recommend that you upgrade your existing instances to use the latest version of EC2Config. By using the latest EC2Config installer, you install SSM Agent side-by-side with EC2Config. This side-by-side version of SSM Agent is compatible with your instances created from earlier Windows Server AMIs and allows you to use SSM features published after November 2016.
Install EC2config service
https://docs.aws.amazon.com/AWSEC2/latest/WindowsGuide/UsingConfig_Install.html
Install SSM agent on Windows
SSM agent installation on Windows has two parts.
1. Create an Activation
2. Agent Installation using PowerShell
Create an Activation
Login your Amazon console and go to System Manager.

Then go to Node Management and select Hybrid Activation.

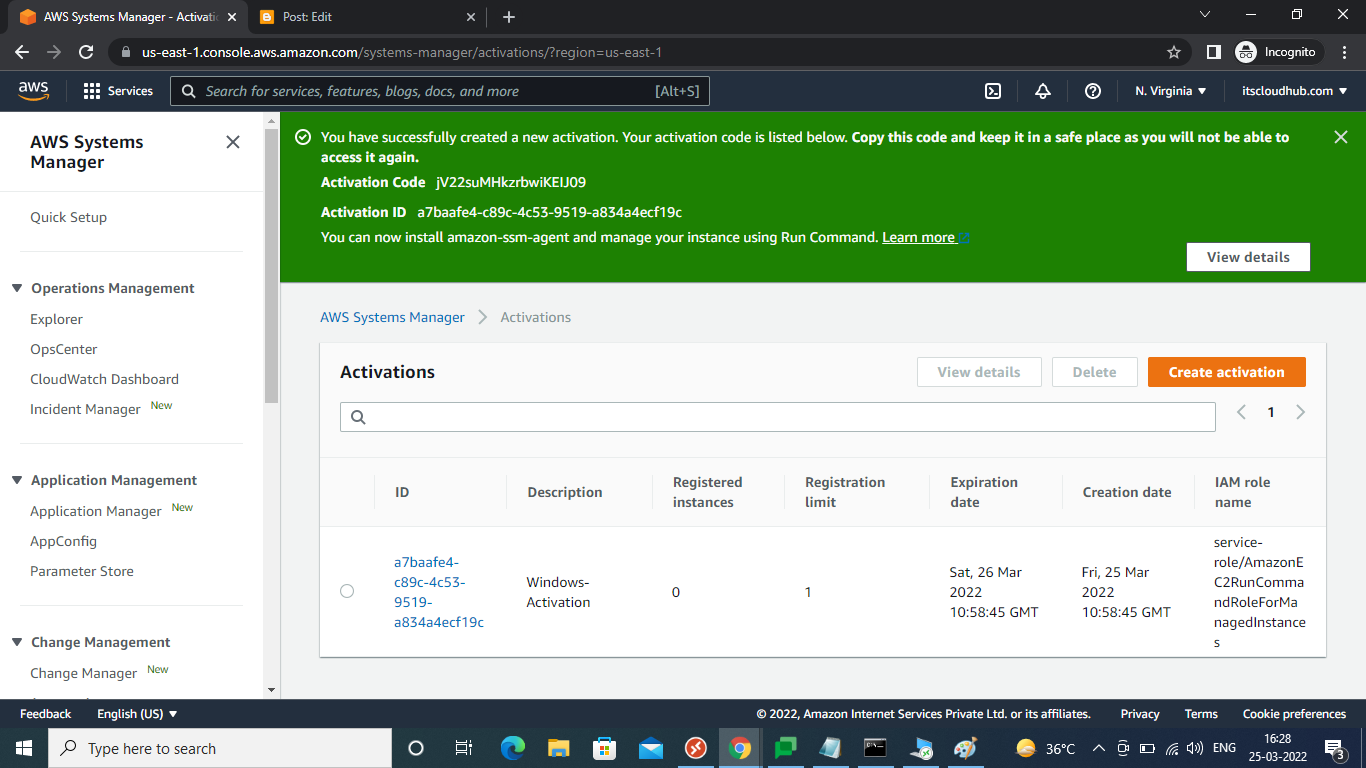
Click Create an Activation to create a new Activation ID.

Then, provide necessary details and click Create activation.

It will immediately create and provide a new Activation Code and Activation ID. We can use this to install SSM agent on Windows and other devices.
PowerShell command to install SSM Agent on Windows
After creating the Activation code and Activation ID, we need to replace it on below command to install SSM agent on Windows machine.

$code = “activation-code”
$id = “activation-id”
$region = “region”
$dir = $env:TEMP + “\ssm”
New-Item -ItemType directory -Path $dir -Force
cd $dir
(New-Object System.Net.WebClient).DownloadFile(“https://amazon-ssm-$region.s3.$region.amazonaws.com/latest/windows_amd64/AmazonSSMAgentSetup.exe”, $dir + “\AmazonSSMAgentSetup.exe”)
Start-Process .\AmazonSSMAgentSetup.exe -ArgumentList @(“/q”, “/log”, “install.log”, “CODE=$code”, “ID=$id”, “REGION=$region”) -Wait
Get-Content ($env:ProgramData + “\Amazon\SSM\InstanceData\registration”)
Replace the Activation Code, Activation ID and Region to install the agent on Windows.
Thank You...!!
Comments
Post a Comment
Comments are always welcome, that will help us to motivate ourselves and improve our services. Thanks!!